How It Works
WebF bridges the web development world with Flutter’s near-native performance by implementing a standards-compliant rendering engine directly on top of Flutter. Understanding this architecture helps you make better decisions about what to build with WebF.
Architecture Overview
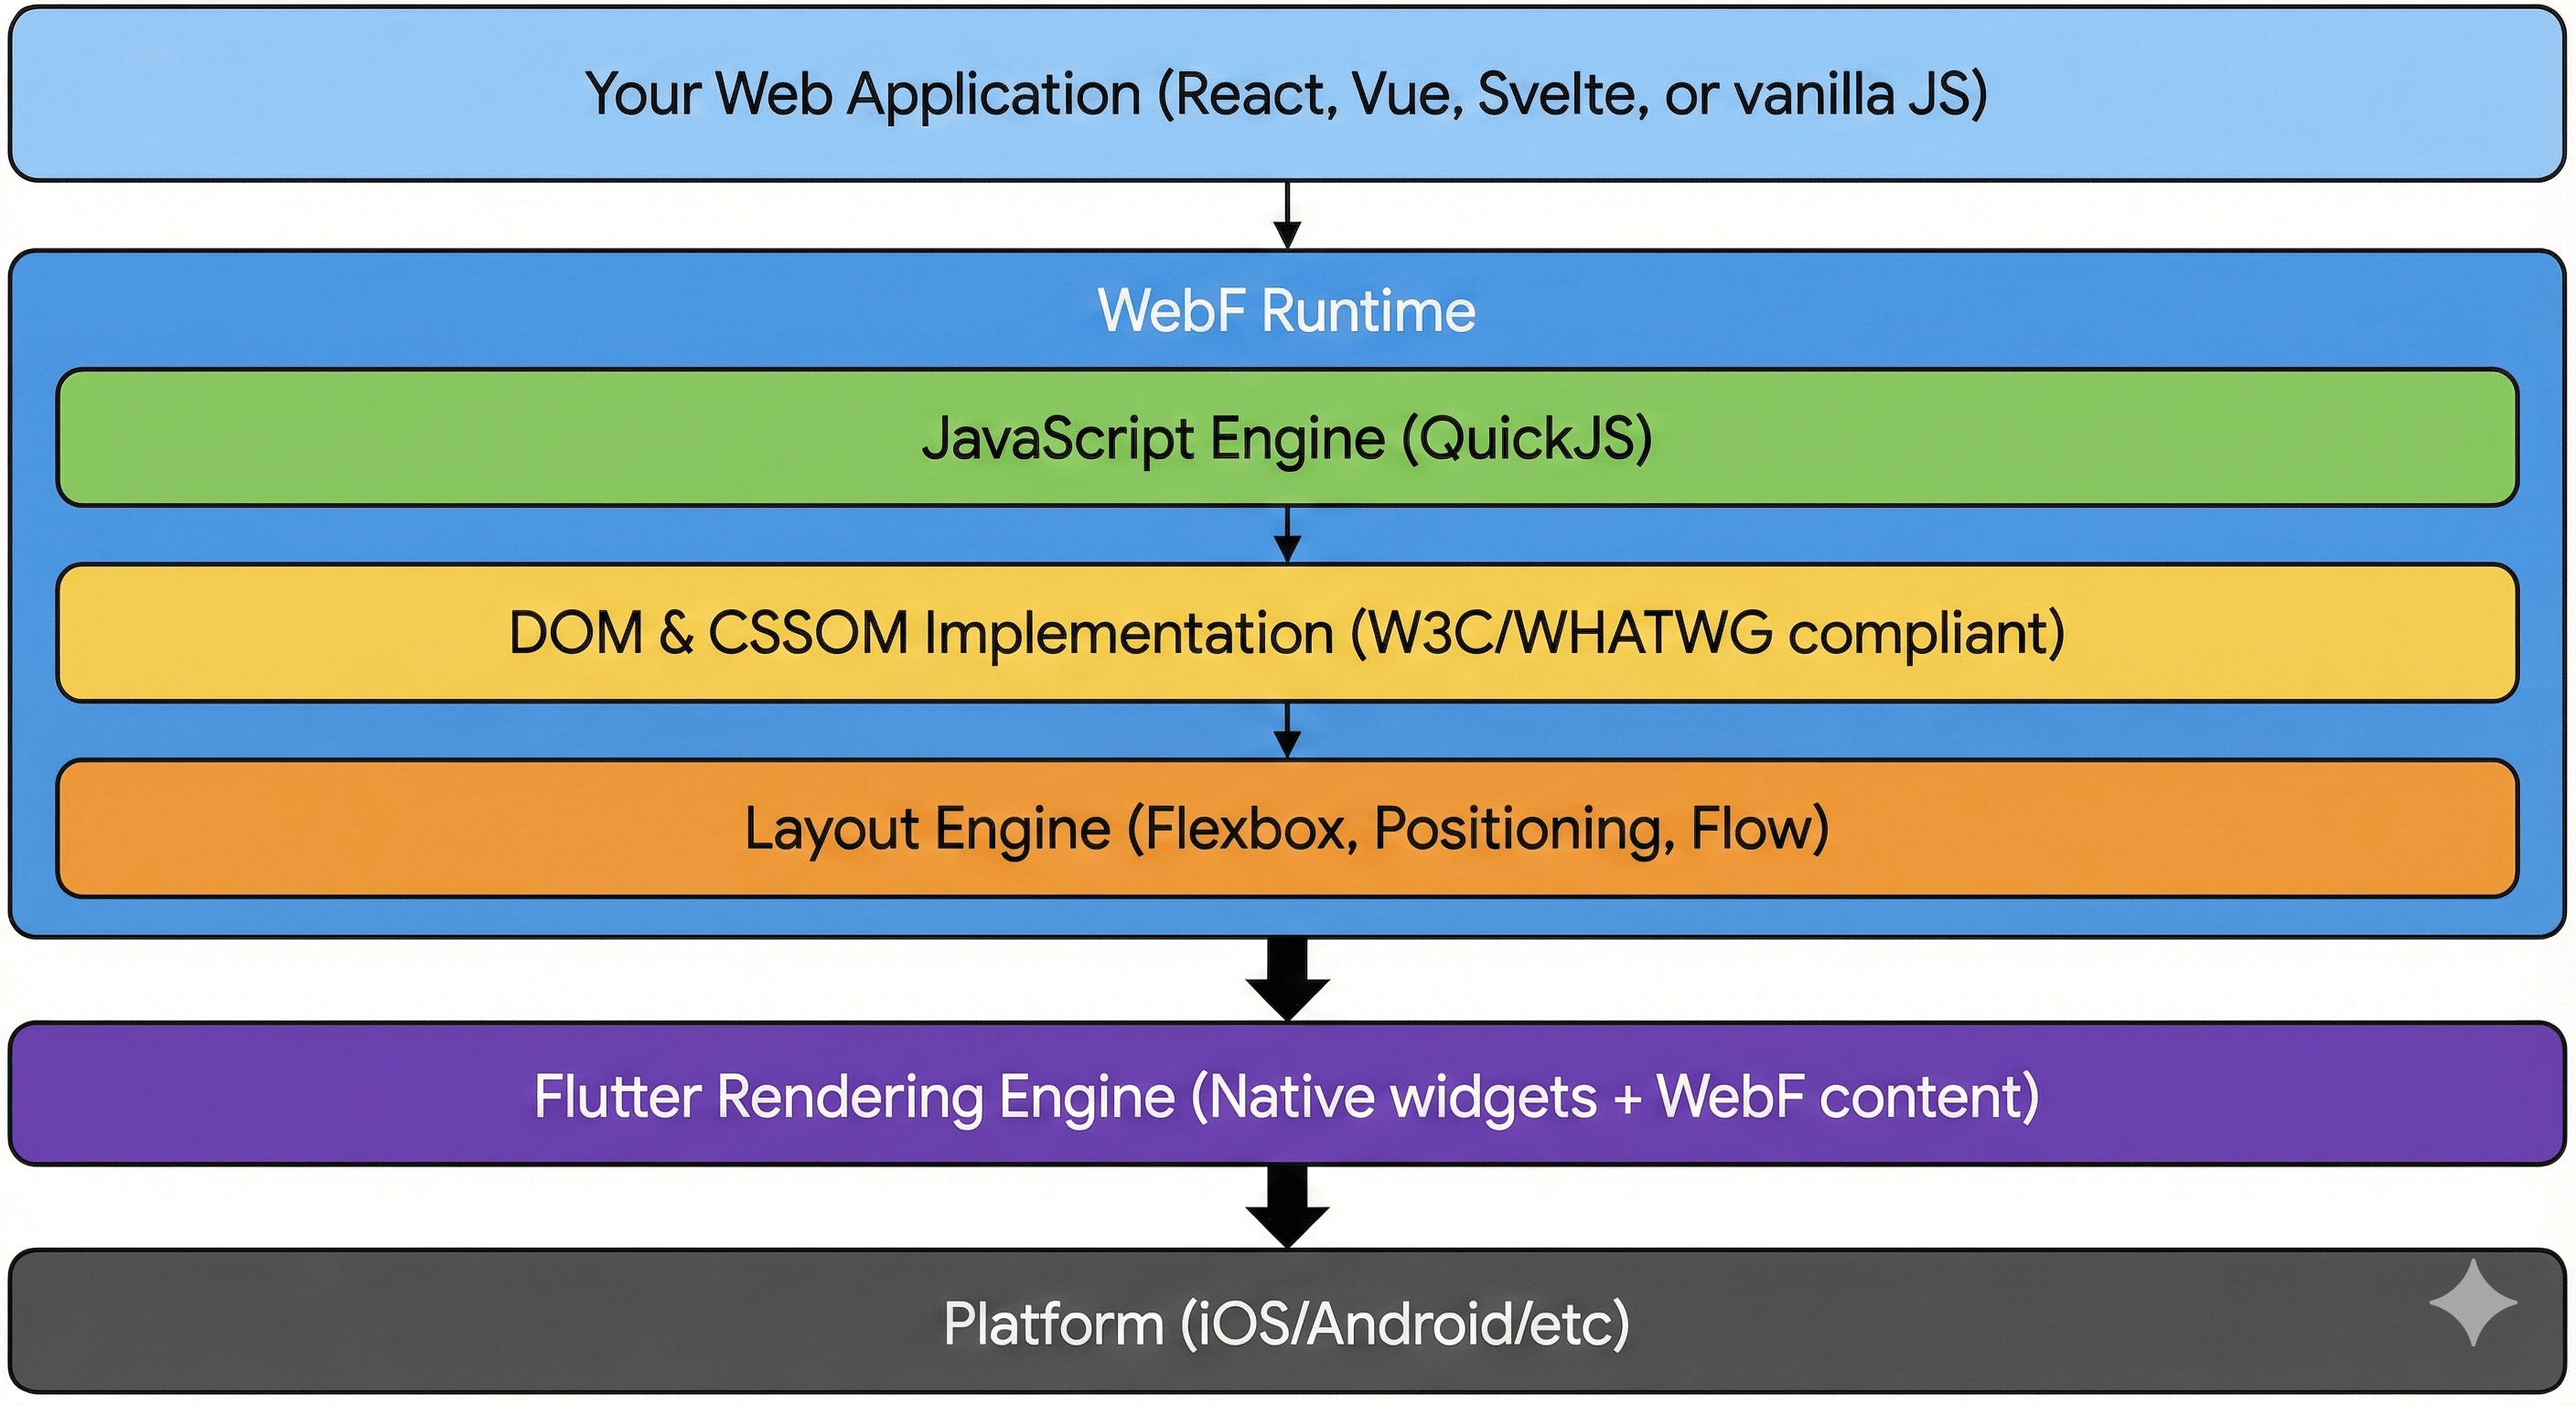
WebF’s architecture consists of several key layers that work together to render your WebF application natively:
Key Components
1. JavaScript Runtime (QuickJS)
WebF uses QuickJS , a lightweight and fast JavaScript engine:
- Modern ES6+ Support: Classes, async/await, modules, and more
- Single Context: One long-lived JavaScript context per WebF instance
- No Web Workers: JavaScript runs on a dedicated thread (workers not needed)
- Fast Execution: Optimized for mobile with low memory footprint
Key Difference from Browsers: Unlike a browser where each tab has its own context, WebF maintains a single, persistent JavaScript context. This means:
- Global state persists across “page” navigations
- No traditional page lifecycle (load/unload)
- Better for single-page applications
2. DOM & CSSOM Implementation
WebF implements W3C/WHATWG standards for manipulating UI:
DOM (Document Object Model):
- Create, modify, and remove elements
- Event handling (capture and bubble phases)
- Query selectors and traversal
- Custom elements for native UI
CSSOM (CSS Object Model):
- Parse and apply stylesheets
- Compute styles for elements
- Support for CSS variables
- Inline styles and style attributes
What’s Supported:
- ✅ Standard DOM manipulation (
createElement,appendChild, etc.) - ✅ Event listeners and propagation
- ✅ querySelector / querySelectorAll
- ✅ classList, attributes, data attributes
- ✅ MutationObserver
What’s Not Supported:
- ❌ Shadow DOM
- ❌ document.write
- ❌
<iframe>elements - ❌ Browser-specific APIs (extensions, etc.)
3. Layout Engine
WebF’s layout engine maps CSS layout models to Flutter’s rendering primitives:
Supported Layouts:
- Flexbox ✅ (Recommended for most UIs)
- Positioned ✅ (absolute, relative, fixed, sticky)
- Flow ✅ (block, inline, and inline-block)
- RTL Support ✅ (Right-to-left text)
Not Supported:
- ❌ Float layouts
- ❌ Table layouts
Experimental:
- 🧪 CSS Grid (most features landed)
Performance Note: WebF uses an async rendering model. DOM changes don’t immediately trigger layout. Instead, updates are batched and processed in the next frame, preventing layout thrashing. DOM mutations in WebF are 20x cheaper than in browsers, but for displaying long lists, use WebFListView for better rendering performance.
4. Rendering Pipeline
The rendering process follows these steps:
- JavaScript Execution: Your code modifies the DOM
- Style Calculation: CSS rules are matched and computed
- Layout: Element positions and sizes are calculated
- Paint: Visual representation is created
- Composite: Rendered content is composited with Flutter widgets
Key Optimization: WebF tracks “dirty” nodes and only recalculates affected subtrees, similar to React’s reconciliation but at the rendering level.
Async Rendering Model
One of WebF’s most important features is its asynchronous rendering:
How It Works
// In a browser, this might cause multiple layouts
element.style.width = '100px';
const width = element.offsetWidth; // Forces immediate layout!
element.style.height = '200px';

// In WebF, layout happens asynchronously
element.style.width = '100px';
const width = element.offsetWidth; // Returns 0 or old value!
element.style.height = '200px';
// Layout happens once in the next frame
Using onscreen / offscreen Events
To know when an element is actually rendered:
element.addEventListener('onscreen', () => {
  // Element is now rendered and measured
  const rect = element.getBoundingClientRect();
  console.log('Element size:', rect.width, rect.height);
});

element.addEventListener('offscreen', () => {
  // Element is no longer rendered
  console.log('Element removed from render tree');
});
For React Developers: Use the useFlutterAttached hook from @openwebf/react-core-ui:
import { useFlutterAttached } from '@openwebf/react-core-ui';

function MyComponent() {
  const ref = useFlutterAttached(
    () => {
      // onAttached - safe to measure
      const rect = ref.current.getBoundingClientRect();
    },
    () => {
      // onDetached
    }
  );

  return <div ref={ref}>Content</div>;
}
Native Binding System
WebF provides a powerful module system for JavaScript to communicate with native code through typed interfaces.
How Modules Work
- TypeScript Definition: Define your module API in a
*.module.d.tsfile - Code Generation: Run
webf module-codegento generate Dart bindings and npm package - Implementation: Extend the generated Dart bindings class
- Registration: Register the module with
WebF.defineModule() - JavaScript Side: Install and import the generated npm package
Example Flow
// 1. Define module API (lib/src/share.module.d.ts)
interface ShareTextOptions {
  title?: string;
  text?: string;
  url?: string;
}

interface WebFShare {
  shareText(options: ShareTextOptions): Promise<boolean>;
}
// 2. Implement generated bindings (lib/src/share_module.dart)
class ShareModule extends ShareModuleBindings {
ShareModule(super.moduleManager);
@override
Future<bool> shareText(ShareTextOptions? options) async {
final text = options?.text ?? '';
await Share.share(text);
return true;
}
}
// 3. Register module
void installWebFShare() {
WebF.defineModule((moduleManager) => ShareModule(moduleManager));
}// 4. Use in JavaScript - consume as npm package
import { WebFShare } from '@openwebf/webf-share';
await WebFShare.shareText({ text: 'Hello!' });Performance: This communication is highly optimized:
- Direct method invocation through WebF’s module system
- Type-safe with generated bindings
- Async by default (non-blocking)
Learn more: Build Native Plugins
Native UI: Custom Elements
WebF’s custom elements allow you to embed Flutter widgets in your WebF apps:
How It Works
// This renders an actual Flutter widget, not a styled div
import { FlutterCupertinoButton } from '@openwebf/react-cupertino-ui';

function MyApp() {
  return (
    <div>
      <h1>WebF App Content</h1>
      <FlutterCupertinoButton onClick={handleClick}>
        Native iOS Button
      </FlutterCupertinoButton>
    </div>
  );
}
Under the hood:
- Custom element
<flutter-cupertino-button>is registered - WebF detects the custom element in the DOM
- Flutter renders the actual
CupertinoButtonwidget - Events flow back to JavaScript as DOM events
Result: You get pixel-perfect native widgets without CSS emulation.
Performance Characteristics
Cold Start
- Development: ~200-300ms
- Production: < 100ms
- Factors: Bundle size, device performance
Runtime Performance
- 60/120 FPS: Animations using CSS transforms
- Batched Updates: Multiple DOM changes processed together
- Efficient Layout: Only dirty nodes recalculated
- Shared GPU: Canvas and Flutter widgets use same GPU context
Memory Usage
- JavaScript Heap: ~10-30MB typical
- DOM Tree: Depends on complexity
- Textures: Similar to Flutter widgets
Comparison with Other Approaches
vs. WebView
| Feature | WebView | WebF |
|---|---|---|
| Rendering | System browser | Custom Flutter engine |
| JavaScript | V8/JSC | QuickJS |
| Native Integration | Limited bridge | Direct bindings |
| Native UI | ❌ No | ✅ Yes |
| Bundle Size | Small (uses system) | Larger (~5MB) |
| Consistency | Varies by OS | Consistent |
| Performance | Good | Excellent |
vs. React Native
| Feature | React Native | WebF |
|---|---|---|
| UI Language | React JSX | Any web framework |
| Native Modules | Bridge-based | Direct bindings |
| Web Compatibility | ❌ Different APIs | ✅ Standard web APIs |
| Debugging | Custom tools | Chrome DevTools |
| Updates | CodePush | Standard CDN |
| Learning Curve | React + RN APIs | Web standards |
vs. Pure Flutter
| Feature | Flutter | WebF |
|---|---|---|
| Language | Dart | JavaScript/TypeScript |
| Ecosystem | pub.dev | pub.dev + npm |
| Hot Reload | ✅ Yes | ✅ Yes (HMR) |
| OTA Updates | ❌ No | ✅ Yes |
| Team Skills | Flutter/Dart | Web development |
| Performance | Excellent | Excellent |
Design Principles
WebF is built on these core principles:
- Standards First: Implement W3C/WHATWG specs correctly
- Performance: Native-level performance is non-negotiable
- Hybrid: Web and native should work together seamlessly
- Developer Experience: Use standard web tools and workflows
- Security: Application code is the security boundary
Next Steps
Now that you understand how WebF works:
- Key Features — Explore what you can build
- WebF Go — Try WebF on real devices
- Developer Guide — Start building your first app